So I have a secret to tell you. I love to cook!! And I love to take
pictures of the food I cook. I just don't really post them. I take them
with the intent of posting them, but never do. Simply because I know
some people would rather not see what I ate or made that day! Well
today I was in the cooking mood, and gosh darn it..I'm going to post the
pictures I took!
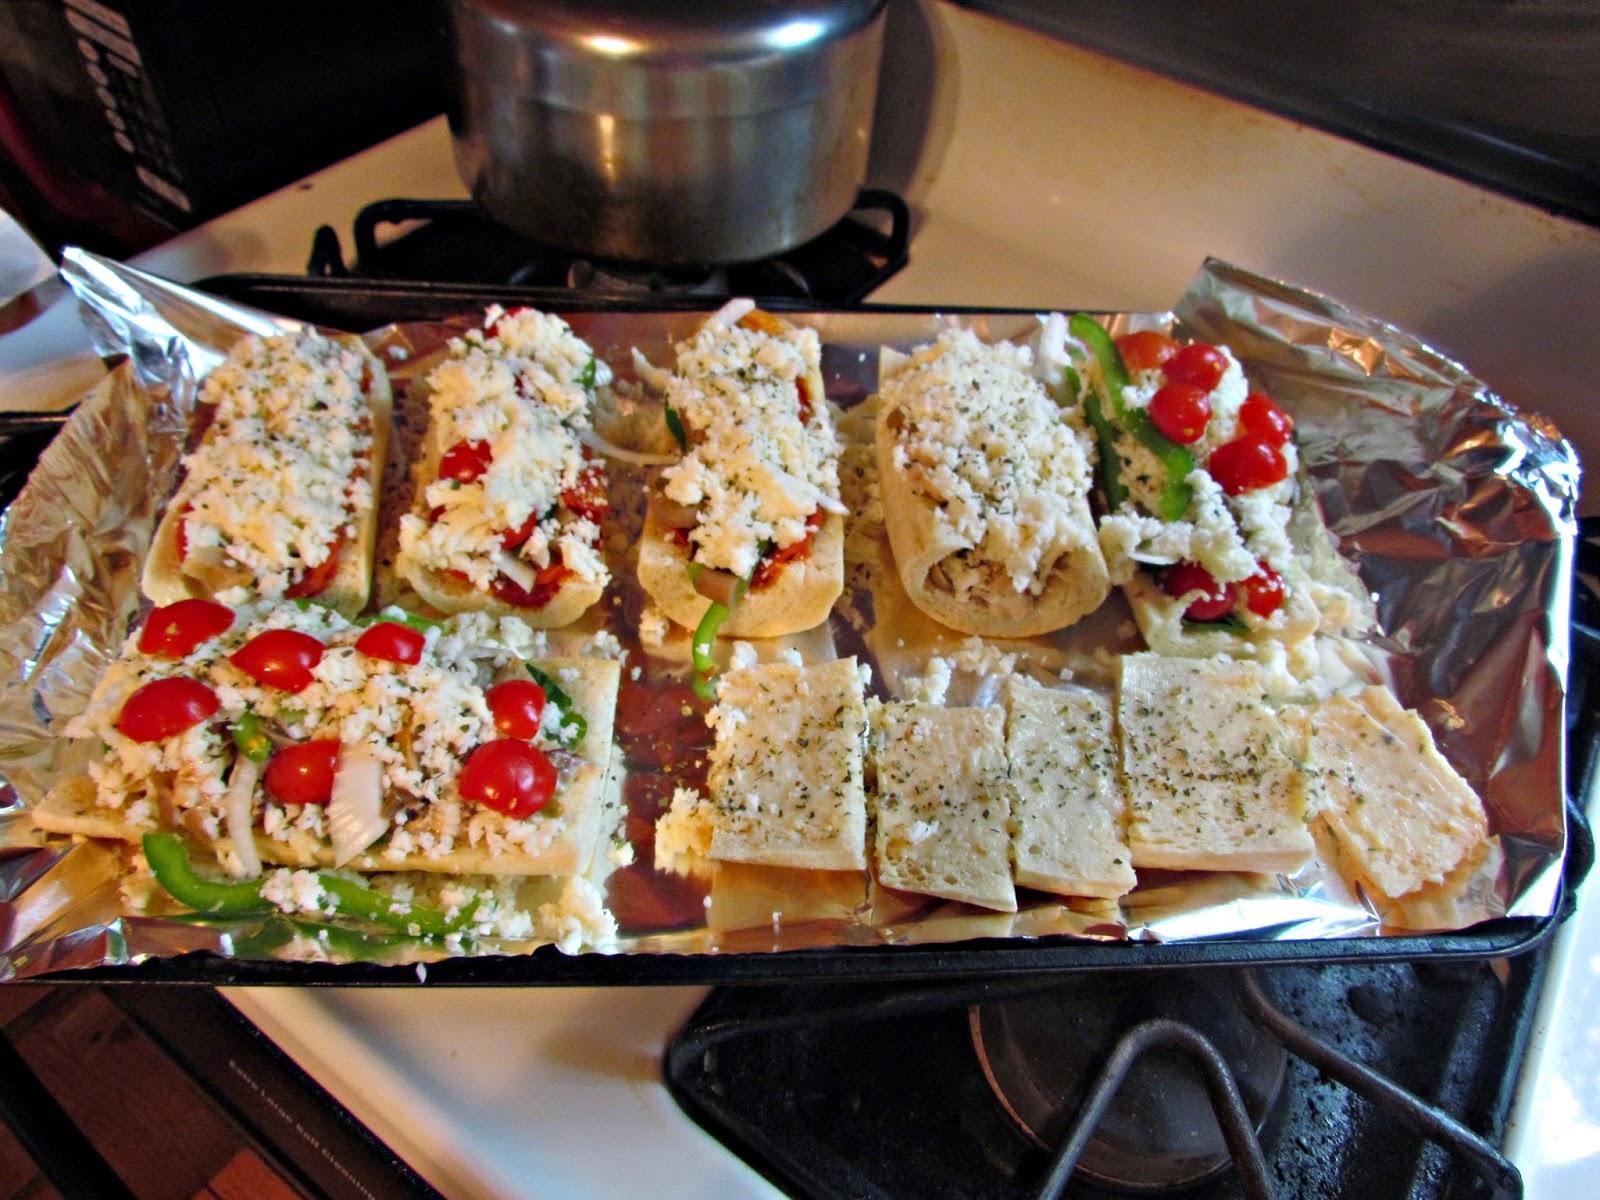
French Bread Pizza's.
Now
I really wanted to get a picture of them after they were baked. It
didn't work out that way. They do not last long in my house. They go
rather quick. Now yes.. French bread pizza's are pretty easy. I mean
come on..how hard could it be? Right?
French Bread Pizza
PreheatOven to 350
1 loaf of French Bread (I like to get mine from
Walmart. They are good, and only a dollar)
Olive Oil
Garlic Powder
Parmesan Cheese
Pizza Sauce
Mozzarella Cheese (or cheese of your choice..)
Toppings of your choice.
Oregano
Take
the French bread and cut it to the
length you desire. Then cut it open
length wise. So you have two sides. Next you want tear some of the
bread out, making a well. I really wish I would have taken pictures of
this. It would be easier to understand. You want to make the well so
your toppings stay in! Next pour some olive oil in a bowl and sprinkle
some (or a lot) of garlic powder. I do not measure this. I guess. So you
really have to play with it and taste to see if you like it. . I
suggest mixing it up and taking some of the bread you tore out to make a
well, and dip in in the oil! Now spread that oil over the
bread..getting inside the well, and the outside edges. This will give
your pizza's a garlic kick which I think actually makes the pizza!
You're house will also smell like a pizzeria when it's all done! Once
you're bread is covered in garlic goodness sprinkle some Parmesan cheese
on it (this is totally optional I do it because I like it). Next start
topping your pizza's with the topping's of your choice! I use pepperoni,
peppers, onions, mushrooms, olives, and tomatoes. You can use whatever
you want. Skies the limit! Top with cheese, and then sprinkle with
oregano if you choose. Now line a cookie sheet with foil. Place the
pizza's on the cookie sheet and bake for 12 - 14
mins. Then crank up the
broiler, and broil them for another 2
mins. Now watch them.. it can
burn fast! Especially if your rack is closer to the flames! This will
give it just enough crisp! Then it's done! Enjoy. But be careful. It is
hot.. it will burn your tongue!
Chicken Alfredo French Bread Pizza
OK
so I didn't get any close up pictures of it, but this is how it
started. Yummy, juicy, garlic
marinated chicken! Which I made on my
George Forman grill..which I LOVE! I love this little thing! This
chicken is so yummy, and juicy, and would honestly be great alone. But I
used it for
Alfredo... and then I used it on a French bread. It was
actually really amazing!! So this is what you're need..
Marinade
3 med-large boneless chicken breasts. Thawed.
Minced garlic - You can do this yourself, or buy it already minced. This is totally optional.
Olive Oil
Garlic powder
salt
pepper
Freezer bag.
Now
in Katie fashion.. I did not measure anything! I guess I need to. It
would help with writing these recipes out. First you want to pat dry the
chicken. Make sure you get all the moisture out of it. Next make small
slits in the chicken, I made about 4 slits per chicken. The salt and
pepper both side. Now I rubbed the minced garlic all over the chicken,
on both sides. I like garlic (if you can't tell). If you are not a
garlic fan, I would totally skip this part. If you do like garlic, like
myself, and chose to rub it down with garlic.. you then want to place it
in
the freezer bag, and put it in the fridge for at least an hour. Let
the minced garlic soak into that chicken! If you choose not to rub it in
a garlic bath.. then you can skip right to this step! Now get out a
medium size bowl, and since I didn't measure anything, I just eyed it
I'm just going to give you an
estimate on amounts here. Take 1/2 cup of
olive oil, and 1 Tablespoon of garlic powder and mix in a bowl. Then
pour the oil mixture in the freezer bag with the chicken.. give it a
good shake, and massage the chicken getting that oil and garlic into the
chicken. Then put in the fridge and let it rest in that bath for at
least 4 hours. Then take it out and cook it. You can grill it, bake it,
fry it in a skillet. Do whatever you want. Just make sure it is
completely done. Meaning no pink. Once it is cooled cut into bite size
pieces. Or however you would like. Now it's time to put this pizza
together. You'll need..
To preheat the oven to 350.
1 loaf of French Bread
Garlic oil from the French bread pizza (above)
Alfredo sauce of your choice, or make your own!! I used
Prego. No I didn't make my own..yet.
Cheese of your choice
(Optional)
Spinach
Olives
Tomatoes
Mushrooms
onions
peppers..
Once again skies the limits!! Make it your own.
Now
that you've gathered all your goodies, take that chicken, put it in a
bowl and mix with the
Alfredo sauce. Make it as
saucy as you want. Then
start to
assemble the pizza's. This is basically the same as you would
the pizza. You can even spread some
Alfredo sauce before putting on the
chicken and other toppings. It's totally up to you. Then bake it for 12 -
14
mins with 2
mins of broiling. Then enjoy!!
I do
want to add that if you do not have garlic powder, garlic salt may be
used instead. Just limit your salt if you choose to use the salt instead
of the powder.